UI testing tips: Selenium locators best practices
August 14, 2017
Table of Contents
Following Selenium locators best practices isn’t merely a good thing to do. Given how little it takes for UI testing to crumble into maintenance hell, having a good locator strategy is a must. And just like most things in UI testing, simple, robust locators aren’t that simple to build.
So if you intend to automate UI testing with Selenium, scan through the best practices outlined in this post. While some of the tips we’ll mention are well-known, chances are you’ll discover a couple of new tricks. In fact, let’s start from simple, beginner friendly practices and proceed to more complicated ones.
1. If you can get your developers to add unique IDs, just do it
Let’s begin with a quick reminder from Captain Obvious: IDs are (and will probably always be) the most resilient attributes for Selenium locators. A best practice that deserves mentioning in this context is less technical, yet it will save you tons of time.
When building locators, it’s easy to forget about the option of asking your developers to add unique IDs to the UI code. So if reaching out to a developer is an option — and if adding unique IDs really makes sense — don’t hesitate. Adding several IDs is a matter of minutes, while it often takes hours to fix a bunch of broken CSS or XPath locators.
2. Target the stable part of dynamic IDs
IDs are only useful when they’re static IDs added by a developer. Dynamic IDs generated by web development frameworks will change with every page load, which renders them useless. Still, there’s a way to work your way around the “dynamic part” as long there’s an unchanging component that you can target. One way to do this is via CSS:
One thing to watch out for with this locator are other element sharing an ID with the same stable part (e.g. stable-68794838, stable-68794839). If there are any of those, the locator will cease to be unique and you’ll be better of using a different tactic.
3. Aim for the long-hanging fruit
One of Selenium best practices for locators is to always look for unique stuff. In ~90% of cases, we’re talking about unique IDs. The remaining 10% account for things like unique name tags, link content (anchor texts), or links that you can use in combination with parent-child structures.
Neither name tags nor links and link text are inherently unique, but they may be unique under certain conditions. Have a look at the example below:
It’s not unusual for a web page to have exactly one subscription form. If that’s your case, the “email-subscription” name value will be unique. So if you’re sure no one’s going to add another subscription form, this name attribute will make for a robust locator.
The folks at 3Qi Labs came up with a neat illustration for this best practice for Selenium locators. The illustration is called the Locator Tree of Life:
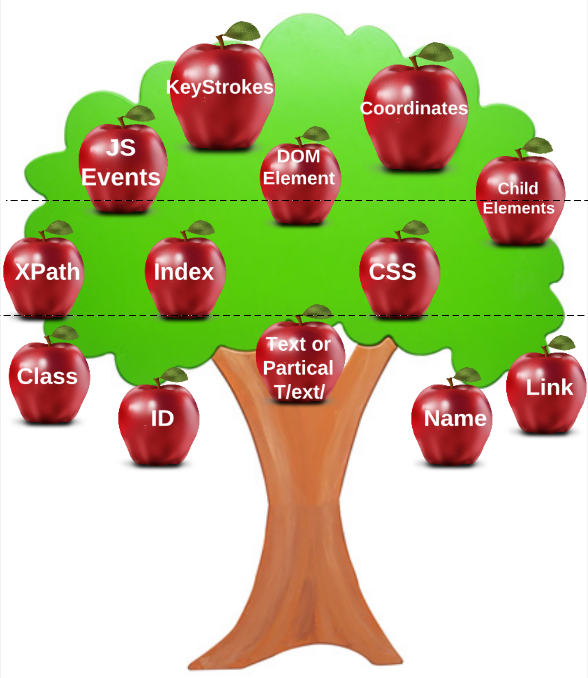
The idea behind this is to always aim for the “low-hanging fruit”. You start with an ID, and, if that option is unavailable, resort to name attributes, links, link texts, etc. If these can’t make for a unique selector, use parent-child selectors available in CSS and Xpath.
4. When working with CSS or XPath keep your locators short
If you’ve got to target an element via its ancestors or descendants, aim for the closest relatives. Immediate parents and children are relatively future-proof; grandparents and grandchildren are still acceptable. Anything that requires a lengthier chain of relatives will probably break before you know it.
You can make locators more reliable by relying on “descendant” syntax as opposed to “child”. For example: #post li as opposed to #post > ul > li.
5. Aim for parents (or children) with unique IDs
Here’s one more best practice for Selenium locators based on parent-child structures. Whenever possible, choose an ancestor or descendant that has a unique ID. In fact, targeting an element via a grandparent with an ID will often prove a smarter solution than using an immediate parent with non-unique attributes. Moreover, it will most probably prove a wiser tactic than directly targeting the element without an ID.
6. Divide and conquer classes with CSS or XPath
Another best practice for Selenium locators associated with the “contains” directive comes down to singling out individual classes.
One problem with classes is that elements typically have several of them:
Targeting the button from the example above by all class values (i.e. ”signup-button button–red button–active”) would make the locator too brittle. Targeting just one of the classes, on the other hand, will result in a more robust locator:
WebElement signupCSS = browser.findElement(By.cssSelector(“button[class*=‘signup-button’]”));
Just like in the case with name tags or links, you’d probably want to use classes in combination with parent structures.
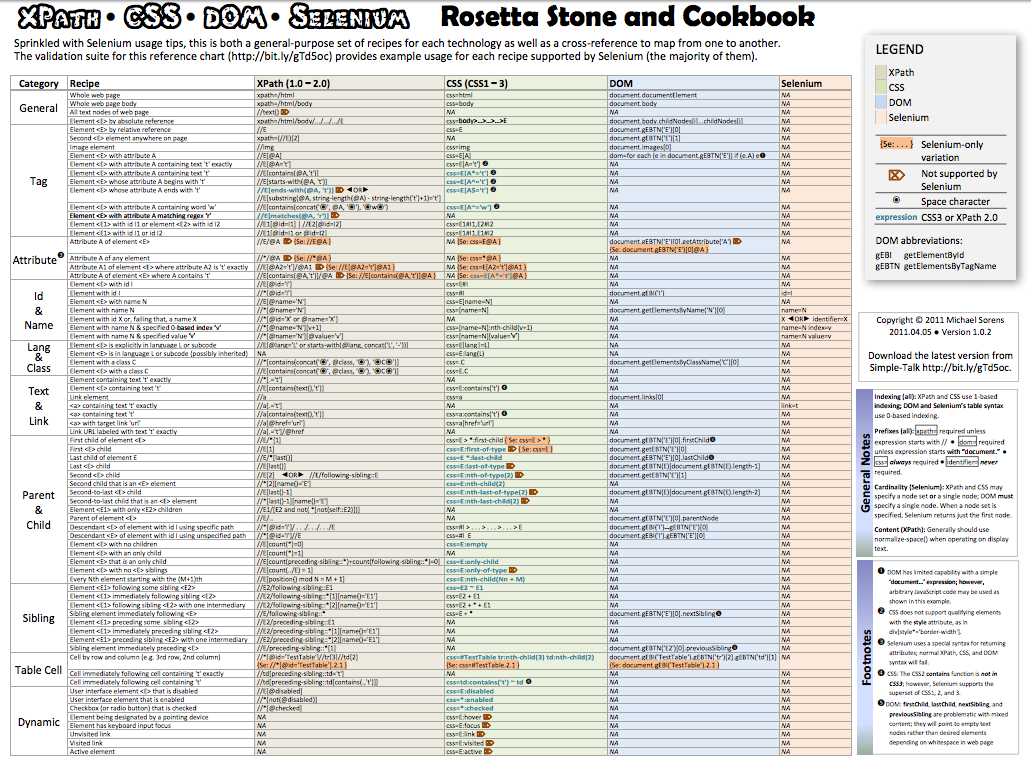
7. Have a good cheat sheet at hand
Being able to keep all locator types in memory is an awesome skill, but very few of us can actually pull this of. For this reason, having a good cheat sheet is always handy. Click on the image below, and you will find a neat cheat sheet from Redgate, with CSS, XPath, and DOM included.
Bonus tip: use a fail-safe lookup algorithm
Let’s admit it, even if you have years of experience and follow best practices, Selenium locators will always be brittle.
IDs might seem like a robust option, but they often get renamed, copied, or simply deleted. Anything other than an ID-based locator has even less chance of living through the complete development cycle. There’s really no such thing as a future-proof Selenium locator, and the ever-changing nature of the UI is the reason for this. So what can you do about?
One way to improve locator reliability is by developing a fail-safe lookup algorithm.
This algorithm would encapsulate element locators in a class shared by all tests while providing some recovery logic in there. For example, if you are looking up an element without an ID, there is a good chance your locator will fail because the attribute has changed. Rather than failing the lookup and the test, the lookup algorithm will attempt to find the closest matching element based on other stored selectors.
Sure, this may lead to unintended consequences if the algorithm produces false positives. On the other hand, you can reduce the probability of false positive by storing enough data about the element.
In fact, that’s exactly how our visual regression testing tool Screenster handles selectors. And the really great part is it provides this fail-safe algorithm out of the box.
Automating UI tests with Screenster
“Record-playback that doesn’t suck” is the most precise description of what we’ve been trying to achieve with Screenster, our very own cloud-based UI testing platform. Here’s why it’s different from any record-playback IDE that you’ve worked with.
Instead of merely recording UX sessions and spewing out autogenerated WebDriver code (like most IDEs do), Screenster provides you with editable codeless test steps. These steps use Visual baselines complete with UI screenshots and DOM snapshots.
When you record a test, the platform creates a full list of locators for each UI element. It further uses these lists as parts of a neat failover algorithm. Whenever the UI changes and the platforms can no longer use one locator, the algorithm automatically switches to another locator from the list. Here’s how this works for the code sample below:
When targeting the first navigation item, the platform will generate a collection of everything that it can use to target the element. This includes it’s own link text, class, and position, as well as all of its parents and siblings, along with their IDs, classes, and other targeting criteria. Here’s what it looks like under the hood:
Screenster will further use this collection to target the navigation item. In case something gets changed, it will check if other ways to target the same element are available. For instance, if the innerHTML gets changed, the platforms will target the nav item as the first li descending from a div with the ‘header’ ID. If that option isn’t available, it’ll switch to parent ul with the header__nav class and so on.
Finally, if each a change to the UI will break all of the locators, you can make the platform generate a new tree by clicking on the element in the screenshot. Sounds interesting? There’s a lot more neat features that Screenster uses to make UI testing more productive:
- Automatic verification of the whole UI. Most UI testing tools make you hand-code verifications or click to verify an element. In the meantime, Screenster automatically verifies every on page element. This means it will detect bugs even in those elements that you’re not targeting explicitly.
- Smart visual testing. Screenster uses sophisticated visual testing algorithms that run pixel-perfect visual testing for each element. Zooming in on individual elements enables us to keep tests super-precise. Screenster also eliminates 99% of false positives you would typically get with Screenshot comparison.
- No tinkering auto-generated code. Test maintenance via auto-generated test is the reason noone use tools like Selenium IDE in real projects. In Screenster, you can edit, add, and remove tests and test steps without ever touching the WebDriver code.
- Support of Selenium and JavaScript. Screenster supports Selenium and JavaScript for custom written tests and test steps. You can also integrate your existing Selenium tests into the Screenster infrastructure.
- Automatic timeouts. The platform automatically detects optimal waiting time for each element, eliminating the need for manual waits.
- Handling of dynamic content. Screenster can recognize text, dynamic dates, and dynamic UI areas like ads or gifs. The platform will detect dynamic content during test recording and test runs and suggest to ignore them during future comparison.
If these features look like something that you, there’s a simple way to check. Try our demo and see how Screenster can automate UI testing for your website or web app, I’m sure you’ll love it:)