Use Invoke Script to optimize your automated testing tool
January 13, 2017
Table of Contents
I’m sure most people reading this blog have at least some experience with automation testing tools for web UIs. And I guess most of us can agree that no matter what testing solution we use, we all follow similar algorithms when automating UI testing.
These algorithms are, in fact, pretty simple. In most cases, they will include roughly the same series of repeated steps for different test cases. Here’s an example:
- Open a starting URL (in 99% of cases, this will be the homepage)
- Log in
- Navigate to a different page (e.g. a shopping cart page, or blog post)
- Do something on that page(e.g. click on a button or scroll)
- Click to check out.
Looks familiar, doesn’t it? Now, the exact steps might differ, but you’ll still find yourself repeating the same routine across different test suites. So doesn’t this seem boring and time-consuming?
Having dealt with all this boring stuff, nearly any person would either search for some shortcuts or drop UI testing altogether. Sadly, many choose the latter — and this is the reason why relatively few companies do regression testing automation.
But there’s actually a way to optimize this process, provided that you have the right automation testing tool at hand. Let’s see how you can eliminate the tedium and avoid repeating the same steps with Invoke Script — a handy feature that Screenster has.
So what is an easy way for a test automation tool to avoid these troubles?

Invoke Script is a feature that enables you to copy an action from a previous test suite and reuse it for your current job. Say, you have two consequent steps:
- Сlicking on link A
- Pressing on button B.
Now let’s imagine that there are additional steps that you need to take once you’ve clicked on link A. Perhaps, visiting the Today’s Deals page and clicking to purchase a couple of items so that your shopping cart page is not empty. Adding these steps manually is one way to do this… However, what if you’ve already recorded the same sequence of steps in this Screenster instance?
Thanks to Invoke Script, you can add these steps before you move on to pressing on button B. Here’s how you can do this:
- Select the “button B” step and use the Invoke Script command to insert a script before it
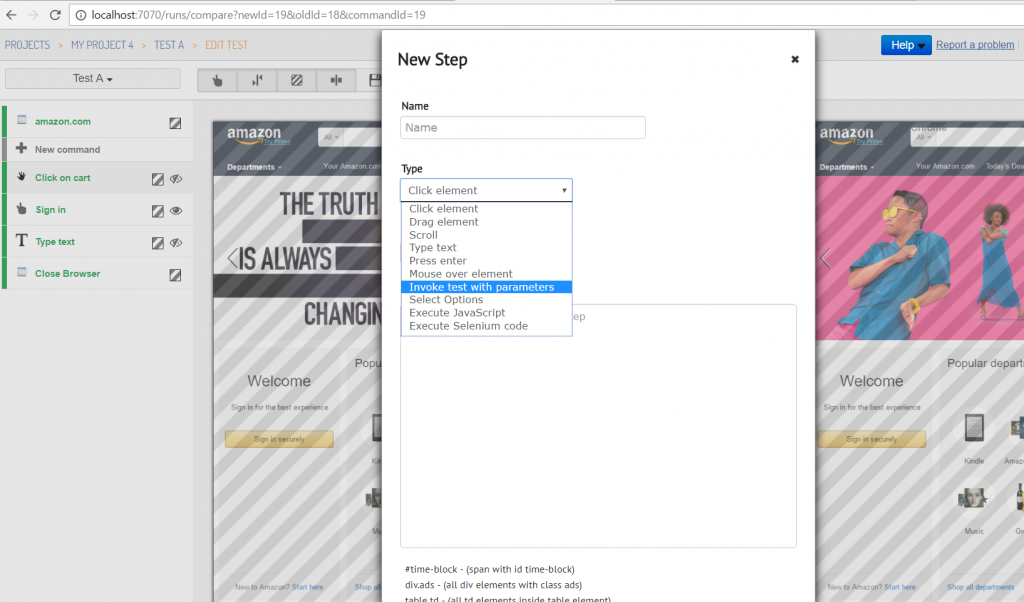
- Find the Invoke command in the Add New Step popup
- Enter the Edit mode of your test
- Click ‘+’ to add a step
- Select ‘Invoke test with parameters’ in the dropdown menu
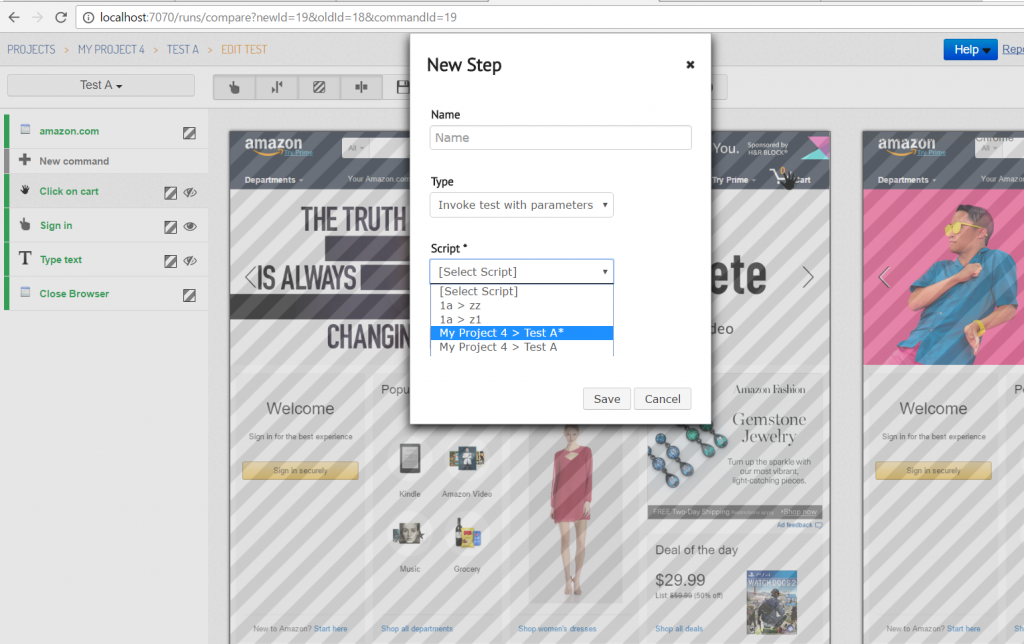
- A new dropdown will appear where you can select one of the tests that you have created earlier in the same Screenster instance (these tests will have black thumbnails instead of screenshots)
- Click on ‘Save’ — and you will see all steps from the selected script added into your current test.
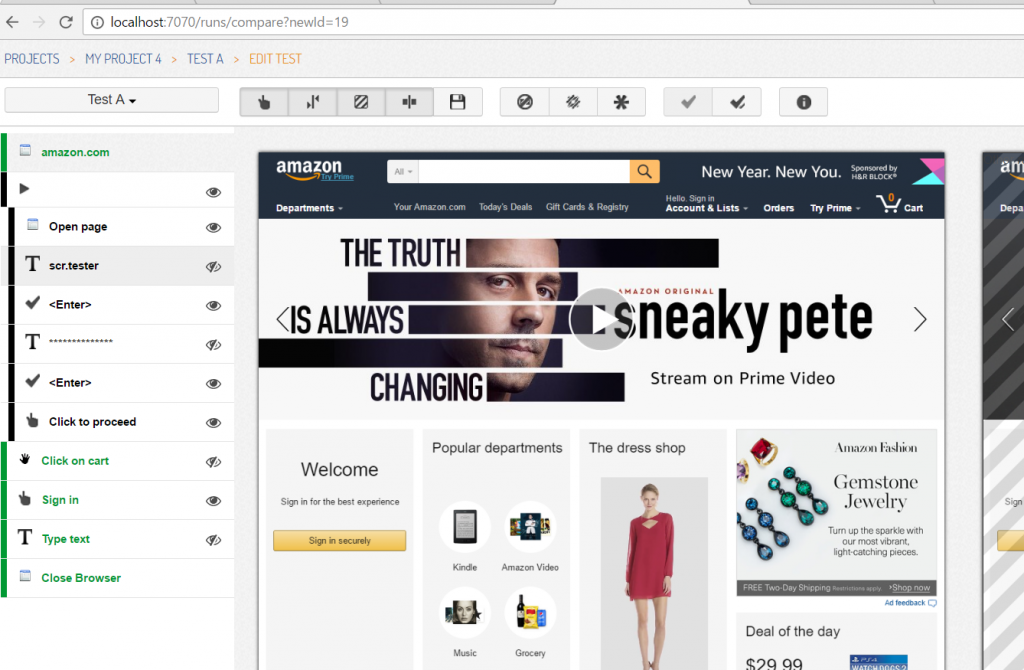
Once you’re through with this, run the test, and Screenster will update it automatically. It will refer to the inserted script, repeat all of its steps one by one, and then proceed to “pressing on” the button B. If necessary, you can invoke as many scripts inside one test as you wish, and vice versa, insert a script into any number of tests.
So as you can see, Invoke Script command is similar to another helpful Screenster’s feature – Extend. And just like Extend, Invoke Script is a must-have functionality for any modern automation testing tool.
Practical use of Invoke Script feature during regression testing automation
Okay, Invoke Script seems like a neat feature on paper, but what about real-life cases? Let me share my own experience of using this feature in my daily work.
Case 1: Automating login for different user credentials
One of my primary tasks is automating the quick daily verification to make sure our online resources work properly. In particular, I am responsible for checking the availability of all administrative pages for different user roles. Now, you can probably guess that this job gets a lot more streamlined if you have a single test verifying all of these pages. The problem is some of them are only visible for certain user roles. This means I have to log in with different credentials to access them.
So, does this mean I have to create a separate test for each user role? This would add a number of duplicate steps and ultimately a lot of time would be wasted. So I just created a new small test where user logs in with different credentials. I marked the test as non-executable so that it would only be called from inside my primary page verification test and will not run itself.
After that, I returned to my primary test, selected an appropriate step where a certain page is checked, and added the Invoke Script command before it. This way, my main test refers to the small test with authorization. In a nutshell, this allowed me to automate the process of logging in to different pages with the right user credentials for each page.
Case 2: Email Verification
Another situation where I made my life easier with Invoke Script is using Screenster for automated regression testing of the email verification process.
During the standard registration procedure, you enter your email into a form click Register, and proceed to checking your inbox for a letter with a confirmation link. Clicking on the confirmation link takes you to your account page, making you a registered.
With the help of Invoke command, I created a separate test where you open your email client, find the letter with the link, and click on it. After that, I inserted this test after the step where you click on the ‘Register’ button. The important detail here is that I added new steps after the inserted scripts with actions in the password-protected space, which was not available before the registration.
Bottom Line
Now that you have a gist of how you can use Invoke script, here are several things to consider when using this feature:
- You cannot edit or delete separate steps of the inserted script in your main test. If you need to change something, go to this script and modify it. Also, you can edit the parameters of this script in the Invoke step of your main test.
- After you have inserted test A into test B, you cannot delete test A because B needs it now to stay in its place. First delete test B if you do not need it anymore, then delete A.
- Once you’ve added an Invoke command before a particular step, this step will display different screenshot because it will start at the point where the inserted test has performed its last action.
Automation testing tools can take your UI regression testing process to a new level, but this road is tricky and dangerous. You should weigh your every step because wrong choices here can lead to troublesome amounts of wasted time and effort.
To minimize risks, start with choosing an appropriate automated testing tool which possesses all necessary features (or at least a major part of them). Ultimately, it will save you from being overloaded with defects found at the user acceptance testing phase.
Can Screenster be such the magic weapon for your project? Trying it yourself is the only way to know for sure 🙂